We’ve
all grown up as web designers staying well away from table based
layouts, but we don’t often brush up on our table building skills ready
for when we will actually need them. Follow this step by step tutorial
to create a slick looking data table to compare the features of various
Harley Davidson motorcycles. We’ll build the table in clean HTML then
polish it up with CSS to create a cool and easily readable HTML table.

The table we’ll be building compares a bunch of features between three Harley Davidson Sportster motorcycle models. Other than the slick design we’re putting together for the sake of this demo, the table will be built with clean HTML then styled with CSS to make the data easily readable.

For the design of this particular demo there’s a few files we need from my original PSD concept. These include a patterned PNG graphic we’ll use as a background, the large black and white photo to fill up the demo background, the Harley Davidson logo and photos of the three bike models we’re comparing.

The demo file begins with a typical HTML structure including Doctype, page title and a link to the CSS stylesheet. The page content begins with a

Next the

After the closing of the

The CSS begins with a simple CSS to remove any default browser styling, then the global styling for this particular demo file is set up. The large background image is added to the page body and overall font styling set up as 16px Georgia in grey.

The

By default the table displays with small gaps between the table cells. Our design requires a kind of margin between the columns but no gaps between the rows. The

Our classes of “iron”, “nightster” and “fortyeight” are all given a background fill of transparent white using RGBa colour selection. We could have used a single class for all these cells, but the name specific classes help us navigate the table data while in code view. To add a finishing touch to the table, the same transparent fill is also added to table rows, but only when they’re hovered by the user’s mouse. This simple effect boosts the usability of the table, helping the user easily cross reference and compare the data.
Check out the complete demo file to see the feature table in action with its hover effect. The use of transparency from the PNG24 files and RGBa colouring really helps create a sleek design when combined with the large background image. Overall these simple table styling techniques can be used on any project to display your tabular data in a readable and easily digestible manner.
The table we’ll be building compares a bunch of features between three Harley Davidson Sportster motorcycle models. Other than the slick design we’re putting together for the sake of this demo, the table will be built with clean HTML then styled with CSS to make the data easily readable.
For the design of this particular demo there’s a few files we need from my original PSD concept. These include a patterned PNG graphic we’ll use as a background, the large black and white photo to fill up the demo background, the Harley Davidson logo and photos of the three bike models we’re comparing.

The demo file begins with a typical HTML structure including Doctype, page title and a link to the CSS stylesheet. The page content begins with a

Next the
character is added. To help us style the table and aid the readability
of the table data while in code view relevant classes are added to the
cells.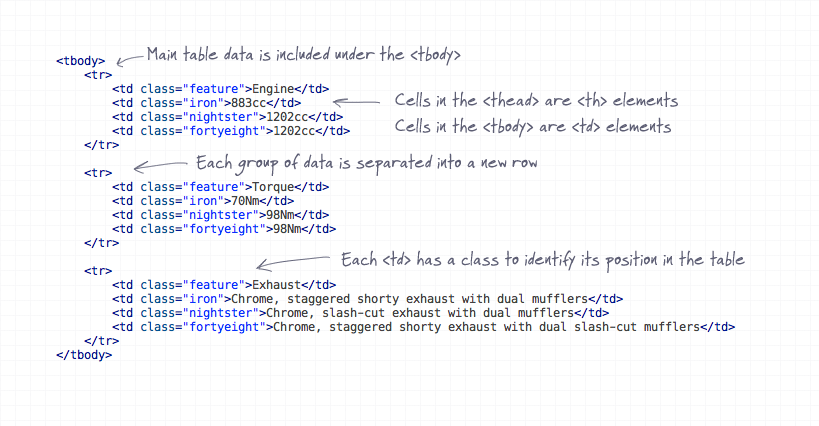
After the closing of the
The complete HTML
Harley Davidson Sportster Motorcycle Model Comparison


Harley Davidson Motorcycles


Iron 883


Nightster


Forty-Eight


    Engine
    883cc
    1202cc
    1202cc


    Torque
    70Nm
    98Nm
    98Nm


    Exhaust
    Chrome, staggered shorty exhaust with dual mufflers
    Chrome, slash-cut exhaust with dual mufflers
    Chrome, staggered shorty exhaust with dual slash-cut mufflers


    Wheels
    Black, 13-Spoke Cast Aluminum
    Black, Laced Steel
    Black, Laced Steel


    Ground Clearance
    120mm
    130mm
    100mm


    Price
    £6,699
    £8,099
    £8,849


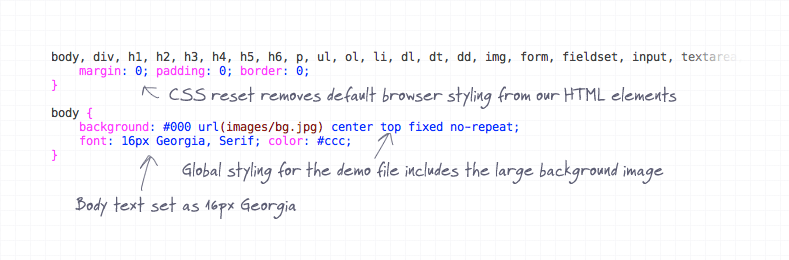
The CSS begins with a simple CSS to remove any default browser styling, then the global styling for this particular demo file is set up. The large background image is added to the page body and overall font styling set up as 16px Georgia in grey.
The
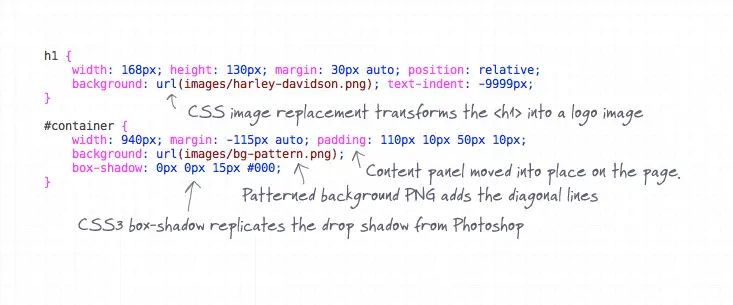
box-shadow is created to replicate the Photoshop drop shadow effect.
By default the table displays with small gaps between the table cells. Our design requires a kind of margin between the columns but no gaps between the rows. The
border-spacing property allows us to designate an exact amount of spacing on both the Y and X axis. Padding is added and text centred on all 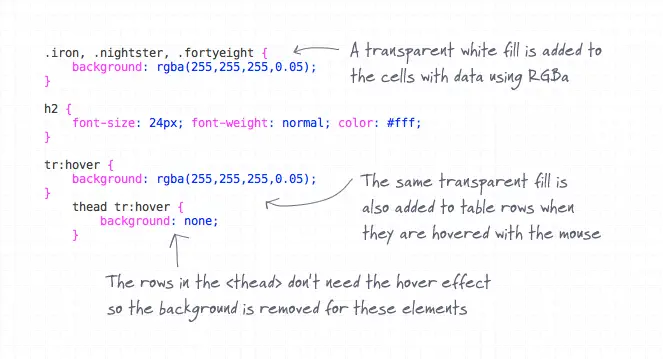
Our classes of “iron”, “nightster” and “fortyeight” are all given a background fill of transparent white using RGBa colour selection. We could have used a single class for all these cells, but the name specific classes help us navigate the table data while in code view. To add a finishing touch to the table, the same transparent fill is also added to table rows, but only when they’re hovered by the user’s mouse. This simple effect boosts the usability of the table, helping the user easily cross reference and compare the data.
The complete CSS
body, div, h1, h2, h3, h4, h5, h6, p, ul, ol, li, dl, dt, dd, img, form, fieldset, input, textarea, blockquote, table, tr, td, th {
 margin: 0; padding: 0; border: 0;
}

body {
 background: #000 url(images/bg.jpg) center top fixed no-repeat;
 font: 16px Georgia, Serif; color: #ccc;
}

h1 {
 width: 168px; height: 130px; margin: 30px auto; position: relative;
 background: url(images/harley-davidson.png); text-indent: -9999px;
}

#container {
 width: 940px; margin: -115px auto; padding: 110px 10px 50px 10px;
 background: url(images/bg-pattern.png);
 box-shadow: 0px 0px 15px #000;
}

table {
 border-spacing: 10px 0px;
}

th, td {
 text-align: center; padding: 10px;
}

.feature {
 width: 183px; text-align: right;
 font-size: 24px; font-weight: normal; color: #fff;
}

.iron, .nightster, .fortyeight {
 background: rgba(255,255,255,0.05);
}

h2 {
 font-size: 24px; font-weight: normal; color: #fff;
}

tr:hover {
 background: rgba(255,255,255,0.05);
}
 thead tr:hover {
  background: none;
 }
The final HTML/CSS feature table
Check out the complete demo file to see the feature table in action with its hover effect. The use of transparency from the PNG24 files and RGBa colouring really helps create a sleek design when combined with the large background image. Overall these simple table styling techniques can be used on any project to display your tabular data in a readable and easily digestible manner.
Create a Slick Features Table in HTML & CSS
![Create a Slick Features Table in HTML & CSS]() Reviewed by JohnBlogger
on
5:51 PM
Rating:
Reviewed by JohnBlogger
on
5:51 PM
Rating:
No comments: